
Try or purchase Audio Conferencing in Microsoft 365 for Teams – Microsoft Teams
See how to try or purchase Audio Conferencing (PSTN conferencing) licenses for Microsoft 365 or Office 365 to set up conference calls that people can dial in to.
With Audio Conferencing, people can call in to Teams meetings using a phone instead of using the Teams app on their mobile device or from their computer.
If you’re a small or medium-sized business with up to 300 users and you currently don’t have any Audio Conferencing licenses, you can get Audio Conferencing free for one year. This free offer is available starting October 1, 2020.
The Audio Conferencing add-on license can be applied to users who have Microsoft 365 Business Basic, Business Standard, Business Premium, Enterprise E1, or Enterprise E3 licenses. To learn more, see Teams add-on licenses
Note
If you have Enterprise E5 or Microsoft 365 Business Voice, you won’t be able to use the free Audio Conferencing offer because these licenses already include Audio Conferencing.
In this article, we’ll walk you through how to set up Audio Conferencing. You only need to set up Audio Conferencing for people who plan to schedule or lead meetings. Meeting attendees who call in to meetings don’t need licenses or other setup. To learn more, see Audio Conferencing.
When you set up Audio Conferencing, a phone number is automatically assigned to your conferencing bridge so that it can be used in meeting invitations. The phone number that’s assigned as the default number of your conferencing bridge will be one from the country or region of your organization. This phone number is a toll number, in which long-distance charges may apply.
Note
You can also use a toll-free number, which requires a few additional steps. To learn more about phone numbers for your conferencing bridge, see Audio Conferencing phone numbers later in this article.
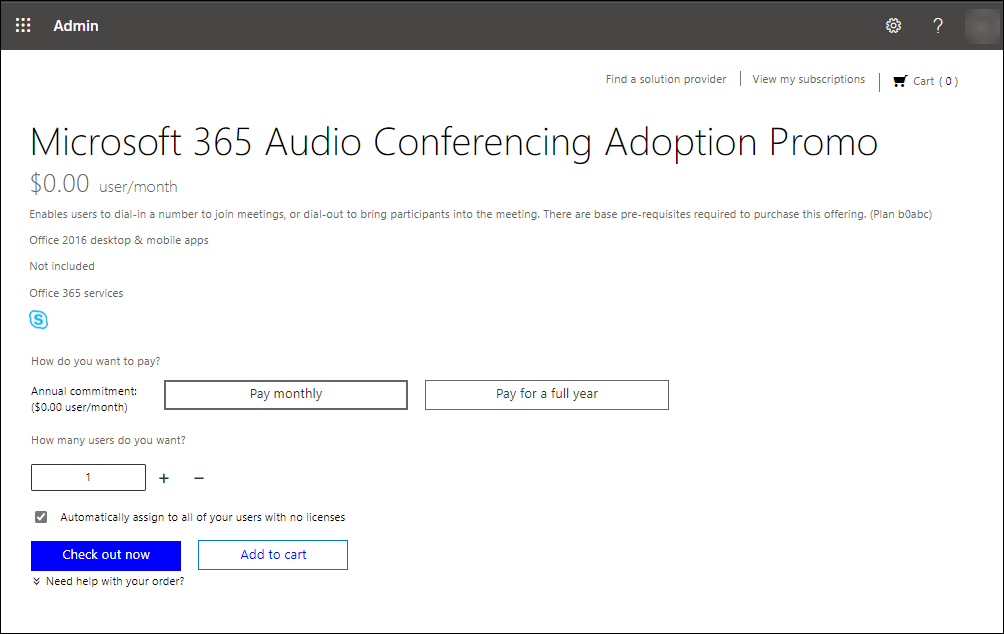
Get one Audio Conferencing license for each person who will lead meetings. Use the Microsoft 365 admin center to do this.
Note
Clear or select the Automatically assign to all of your users with no licenses, depending on whether you want to automatically assign an Audio Conferencing license to all users who don’t have this license.
Assign a license to each person who will lead meetings. Use the Microsoft 365 admin center to do this.
Your meeting organizers can now schedule meetings in Outlook. In Outlook, go to Calendar, and then select the New Teams meeting button. The meeting dial-in numbers and the conference ID are automatically added to the meeting invitation that’s sent to meeting attendees. To learn more, see Schedule a Teams meeting in Outlook.
Note
If you want, you can customize meeting invitations to add your company logo, links to your support website and legal disclaimer, and a text-only footer. To learn more, see Customize meeting invitations.
There are two types of numbers that you can use for your conferencing bridge. You can use either shared numbers (as in the Set up Audio Conferencing section earlier in this article) or dedicated numbers. Here’s more information about each.
A shared number is a number that’s shared across all organizations. Shared numbers are toll numbers and are automatically assigned when you set up Audio Conferencing.
To see the default number that’s assigned to your conferencing bridge, in the left navigation of the Microsoft Teams admin center, go to Meetings > Conference bridges, and then find the number for the location that’s nearest to you.
A dedicated number is a number that’s available only to your users. A dedicated number can be a toll number or a toll-free number. To use a dedicated number, you’ll have to first get the number, assign it to your conferencing bridge, and then assign the number to each person who will lead meetings.
There are a couple ways to get a dedicated number. You can get a number from Microsoft or transfer (port) an existing number from your current service provider to Microsoft. To learn more about how to do this, see Getting service numbers.
Keep in mind that if you use a toll-free number, you have to first assign a Communications Credits license to each person who will lead meetings. To learn more, see Set up Communications Credits for your organization.
After you have your number, assign it to your conference bridge. Use the Microsoft Teams admin center to do this.
Then, assign the number to each person who will lead meetings. Use the Microsoft Teams admin center to do this.
See how to try or purchase Audio Conferencing (PSTN conferencing) licenses for Microsoft 365 or Office 365 to set up conference calls that people can dial in to.
Learn about Calling Plan (PSTN Calling plan) for Skype for business options and how to get licenses for your organization.
Learn about add-on licenses for Microsoft Teams and the features you get with each license.
The Microsoft Teams Phone with Calling Plan bundle is an inexpensive option for voice calling, enabling small and medium businesses to communicate better.


Reviews
There are no reviews yet.